

Shorts
You Too Can Be A Flaming Carrot!
by: -RoG-
Nothing would make a parent prouder than to hear their child proclaim, "Mommy! Daddy! When I grow up, I want to be a Flaming Carrot!" Now, I'm sure some of you are all grown-up now, but still have yet to accomplish those dreams. Well it's time to take said dreams off the backburner and make them a reality!
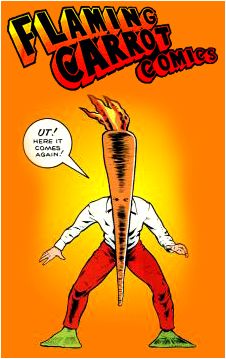
The Flaming Carrot is probably my favorite comic book character ever (though "The Tick" definitely ranks right up there too). He's just got a wonderful way with words and the comic books are just bizarre enough for me to be interested in them. Well that and they've also had some nice crossover issues with the Teenage Mutant Ninja Turtles in which Raphael loses his memory and becomes the "Dark Avenger" - a hero with a cape that says "bread" on it, a sack for a mask, and plungers for weapons. As if that's not enough, they've had Christopher Walken, Luciano Pavarotti, and Fabio... all in the same comic. If that doesn't make you want to rush out and buy every Flaming Carrot comic in existence, nothing will.
But what about those of us who need more than the comic books? Well, by following my handy-dandy guide, you'll soon be able to become the Flaming Carrot and shout "UT!" at everyone with pride! So let's get started!
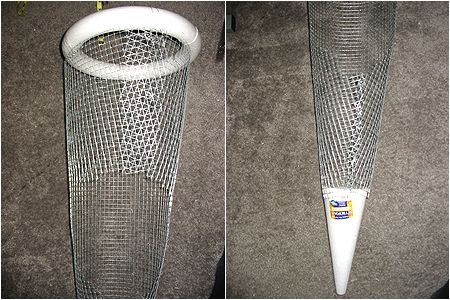
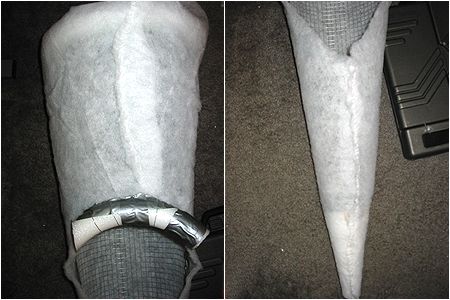
First thing you need to do is make a run to Home Depot and a crafts shop of some sort. At Home Depot you should be able to find a roll of chicken fencing wire (or something close enough too it). They have all sorts of fencing, so just make sure the kind you get isn't gonna be too heavy for you to wear or too hard for you to bend. At the craft shop, just pick up some styrofoam. You'll want two styrofoam ring for the top and for the neck rest, a styrofoam cone for the bottom of the costume, and a decent sized square of styrofoam so you can cut out a circle (which I'll explain later on).
Ok the first thing you want to do is measure out the chicken wire and hold it up to your head. Make sure that it's going to be taller than you already are, but not too tall, because you'll still need room for the "flame" later on. Once you're satisfied with the height, cut the fencing and bend it into a cone shape. Then all you have to do is use the wire you bought to tie it down. Tying it down should take you a while because you want to make sure that it's not going to pop open and kill somebody while you're walking around later on. It is fairly time consuming but trust me, you'll be glad you took the time to do it.
After you've tied it down, you'll want to cut out an oval shape in the back with some wire clippers. Just make sure that there's enough room for your head to fit in completely. It's a trial-and-error type of thing, so don't get frustrated if it doesn't feel right on your first try. Just keep cutting wire away until it feels right.
Next you'll want to drop the cone into the base and secure it so that it doesn't move. Because of the nature of styrofoam, I didn't really have to do much to secure it really, you just shove it into the base and it stays.
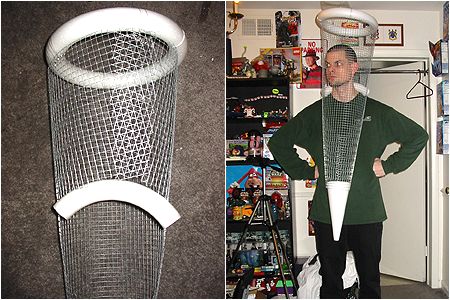
You'll also want to take one of the rings and attach it to the top of the frame, because this will really help you make a solid foundation for the flame to sit upon later on. Now take the other styrofoam ring, cut a portion out of it and loosely attach it to the top of the cutout so that you can rest the frame on the back of your neck without having to worry about the wires jabbing into your skin. Huzzah! We've got ourselves a frame!
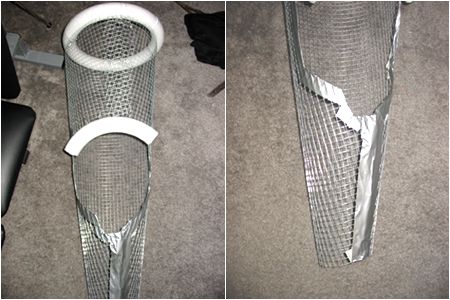
One thing I strongly recommend doing before you proceed to the next steps is taking some duct-tape and placing it over all of the areas in which you cut. Not only will this prevent you from getting stabbed by the fencing, but it will also prevent the fabric from tearing.
Alrighty, now that your frame is all set to go, you'll want to buy some batting from a crafts shop. You can find the stuff pretty much anywhere though... I found a pack of the stuff at Wal-Mart. The batting will not only give a thicker look to your costume and help prevent the fabric from tearing, but it will also make it so that the wire-frame doesn't show through the fabric. So just wrap the batting all around the frame and then just sew it together. You should also secure the neck rest on a little better now with some wire and duct tape.
If the goal was to become an albino carrot, our work would already be done. However, we're striving to become a Flaming Carrot, so there's still more to do!
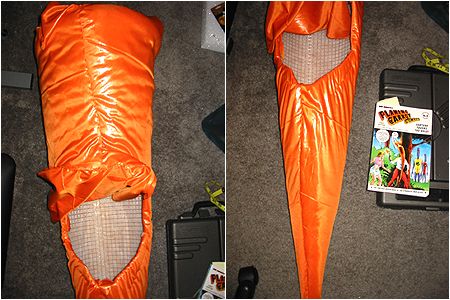
I have to say that I really lucked out with the fabric I found. In a local crafts shop they had all sorts of cool fabrics, but I found one that was shiny gold on one side and orange on the other. The cool thing is, when you flip it over to show the orange, the gold side shines through just enough to give it a nice wet vegetation kind of look. Just the right amount of shininess. Still, any orange fabric will do.
Now I'll be the first to admit that I can't sew to save my life, but luckily Re can, so she helped me out big-time with the sewing.
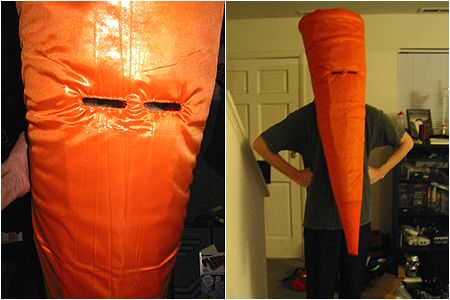
Once the fabric is sewed on nicely you'll need to give yourself some eyes. You can make them big as you like, but I prefer to keep them thin and wide so that they're as close to the comic book as possible. Put on the costume to determine exactly where the eyes should be and then clip out the wire and cut the fabric. Just make sure that you'll be able to see out of the carrot well enough.
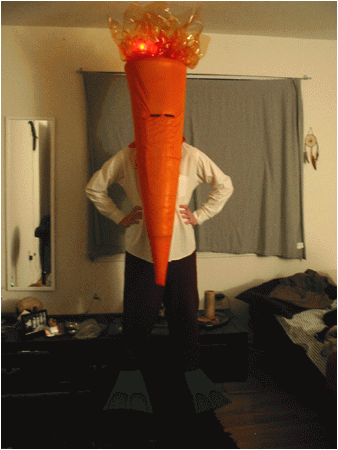
Lookin' pretty good eh? Definitely! But we've still got some work to do. This carrot is in need of a mighty flame! A flame that would make children weep in utter terror! So let's get started!
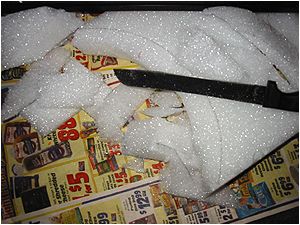
Using the big chunk of flat styrofoam you purchased, use a big cut out a circle that's slightly smaller than the diameter of the top of your carrot costume. Again, this takes a little bit of trial and error, especially since it's not to easy to cut a perfect circle out of thick styrofoam.
Once you've got it down to the right size, you'll be able to place your circle into the top of the carrot frame and it will also help tighten up the fabric even more. Now you'll want to choose just how you're going to light-up the frame. Of course, some people would skip this step and just be happy with a flame that doesn't light up... but come on! You've taken it this far, why not go the extra distance!
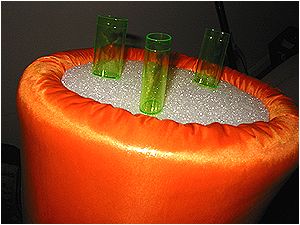
I purchased some "Pumpkin-safe" lights at wal-mart. They're basically little green tubes that you can jab down into pumpkins with removable light bulbs. When you have batteries placed in them, they'll flicker on 'n off. Granted there's plenty of other ways you can light the thing up, but I found the pumpkin lights to be both the coolest looking and most efficient method. I recommend getting roughly three of them. And don't worry, they're fairly cheap at only 2 bux a pop. Instead of jabbing them into a pumpkin, you simply jab them down into the styrofoam circle that you cut out and they will not budge. Perfecto!

Ok now that we've got the spots for the light secured, you'll want to get the actual flame put on. For the flame you'll want two things: 1) Some orange cellophane and some red tissue paper. Take the orange cellophane and cut it into strips, crinkle them up and place them around the edge of the styrofoam top. You'll have to figure out how you want to secure the cellophane onto the top, but I simply used a combination of wire and tape. Just make sure that it's secured well enough so that a gust of wind isn't gonna blow the stuff off of your head and make you look like a sad carrot.
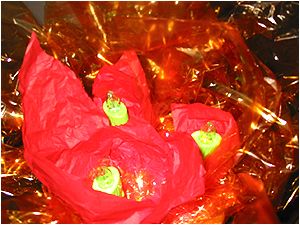
Next, cut out even smaller triangular strips of the red tissue paper and place them in the center of the styrofoam circle, around all the sides of your pumpkin lights. Now all you need to do is place the light bulbs back into the plastic tubes that you jabbed into the styrofoam and your costume is good to go.

Now before you go run out into the streets with stink bombs and throwing them at innocent bystanders in the name of carroty justice, you may have noticed that the Flaming Carrot has swimming flippers for feet. Green swimming flippers. Sure, you could just ignore the flippers, but then you'd have to deal with every comic book geek who calls you on the fact that you don't have flipper feet. On the other hand, if you were to wear actual flippers, chances are, you'd trip on them at some point and end up killing yourself. So I suggest buying some near paper-thin green fun foam and cut out two flippers that you can rest on top of your shoes. You can color them in a bit with markers and sew some elastic onto them so that they'll fit on you snugly. Now you'll satisfy both the comic book geeks and your own personal desire not to kill yourself while in costume.
UT!
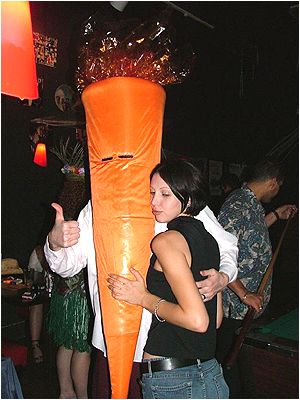
So there you have it folks... a fully functional, super rocktastic Flaming Carrot Halloween costume! So get out there, build your Flaming Carrot costume and make the entire world grovel before your carroty godliness! And remember...
FLAMING CARROT
GETS
ALLLLLL THE LADIES!
Questions or Comments about this piece?
-RoG-
If you enjoyed this piece, be sure to check out:

Follow us on:
![]()
![]()
![]()
![]()
Want Your Ad Here?
Send us an email!


[Features] [Shorts] [Games] [Comics] [Weeklies] [Blog] [Info] [Store] [Advertise] [Home]
![]()
Copyright © 1997-2025 I-Mockery Productions : All Rights Reserved : (E-mail)
No portion of I-Mockery may be reprinted in any form without prior consent.
We reserve the right to swallow your soul... and spit out the chewy parts.
Reader Comments